Technical data:
- Newton-reflector
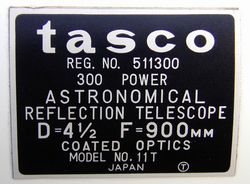
- 4.5" (114mm) diameter of the mirror
- 900mm focal length
- f/8
- Focuser for eyepieces with 0.96" (24,5mm) diameter

My Newtonian telescope: Tasco 11T
Technical data:
- Newton-reflector
- 4.5" (114mm) diameter of the mirror
- 900mm focal length
- f/8
- Focuser for eyepieces with 0.96" (24,5mm) diameter
Fig. 1 - Type label
Below you will find images of some details of the telescope.
Due to the number of photos it will take a while until all images
are being loaded - Please be patient!
Fig. 2 Typical set up of a Newtonian telescope. Click into this picture to load a high-res image!
Fig. 3- The telescope on the german (parallactic) mount and the tripod
Fig. 4 - The viewfinder on top and the focuser with a 22mm Kellner-type eyepiece in front. Here you can see the digital camera adapter made out of brass.
Fig. 5 - Detailed view of the focuser.
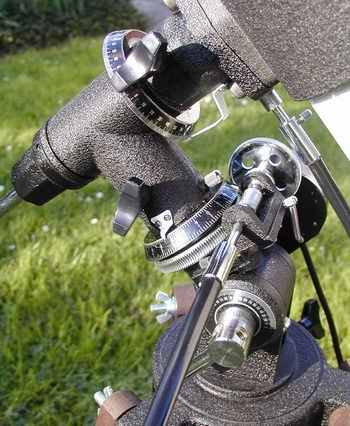
Fig. 6 - The german (parallactic) mount. On the left side you can see the balance weight.

Fig. 7 + 7a - The axes of the mount: If it is adjusted to the geographic latitude (here: 48.1° N) of the location and the RA (right ascension) axis is positioned towards north (where the star "Polaris" can be found in the northern hemisphere) observations become very easy: The rotation of the earth can be compensated almost perfectly by revolving the RA-axis which can be performed by a stepper motor.
Fig. 8 - Here you can see the control unit of the stepper motor.
Fig. 9 - Several gears are used to transmit the movements of the stepper motor to revolve the worm wheel which moves the RA axis with a constant angular velocity to compensate the rotation of the earth.
Abb. 10 - This picture shows the adjustment of the geographical latitude again. The worm wheel of the RA axis can be seen also.
Fig. 11 - A look into the OTA (optical tube assembly): In the center of three thin arms the secondary mirror is located to reflect the light into the eyepiece. At the bottom of the tube is the parabolic primary mirror with a focal length of 900mm.
Fig. 12 - The secondary mirror which can be adjusted by several screws is inclined by 45° against the optical axis of the primary mirror.
Fig. 13 - My digital camera adapter: A threads adapter (brass) is screwed into the focuser. On the back side of it an ordinary SLR-lens is mounted (24mm, f/2.8). And on the back side of this lens another threads adapter is used to mount the digital camera.
Fig. 14 - Another view of the focuser, the camera adapter and the SLR lens.
Fig. 15 - The camera adapter made out of brass. 0.96" eyepieces can be used for visual observations.
Fig. 16 -The adapter was built using this constructional drawing
Fig. 17 - From the center of the cover of this telescope a round piece can be pulled off. I placed a safety film for solar observations behind this smaller cap.
Take a look at the DIY section of my homepage. There you will find a more sophisticated description how to build a filter for solar observations!Always be very careful when you are observing the sun! Never look into the eyepiece during the day when no safety film for solar observation is installed! Use only high quality safety film or glass filters to protect your eyes and your equipment.
Fig. 18 - View through the viewfinder - it is really low quality :-(
Read this interesting article for more
information: "The Saga of a Tasco 11T":
http://www.adelaide.net.au/~dbenn/Astronomy/tasco11T.html
(c)
 May 04,
2002, URL: http://www.emling.de
All information is provided without warranty!